Latest Updates
Showing posts with label seo. Show all posts

10 Free Online Broken Link Checker Tools

114 comments:

10 Free Online Broken Link Checker Tools


When you click on a link that is supposed to take you somewhere, yet instead it takes you somewhere else or shows a 404 error message… this is a broken link. The most common causes for a broken link include, but are not limited to :
  • The target website is permanently unavailable
  • The target web page has been deleted
  • The target web page permalink was modified or changed

Broken links are very unpleasant for end users of your website, and can hurt your reputation. It makes sense that having several broken links on a website is often referred to as “link rot”… because it really is as pleasant as that phrase sounds. 
Use this broken link checker to quickly locate any broken links on your website so you can correct any flaws immediately. It’s as easy as entering your URL and hitting enter.


1. Broken Link Check


You can only really check your homepage with the free version as the free version doesn't allow you to use slashes. Try the tool and it takes you to an annoying captcha screen, but pass that and you get to see your broken links. You can report distinct breaks or all occurrences. The fact they give you the option is better than some lesser link checkers.

2. W3C Link checker


On this website you will see the tool and a list of options. You can see a summary only, or you can see the chunky raw data. You can hide redirects, you can “don’t send the accept language header”, you can “Don’t send referrer header” and you can check linked documents recursively and name the recursion depth. You can even save your choices in the options as a cookie on your computer. Not that it matters, but this website has a PageRank of 9, which means they may know a little about SEO.

3. Submit Express


This tool will check the outgoing links on your page to see if they are broken. It will only check the links on the URL given, so if you want to check more pages from your site, please try them seperately.

4. Small SEO Tools.


5. WDG Link Valet


This has an ugly and/or basic website design, which is surprising since the creators are part of a web design group. Still, it is free and easy to understand because just under the tool are a few descriptions of what the results mean.

6. IndiaBook Free link checker


This is a tool that is hosted on a very basic looking website design, but it does the job of checking your links. The basic format upon which the tool is hosted is simple and the results are basic, with no frills at all. Still, it does the job of checking your links to see if any are broken. There is a chunk of text before the tool that you need not read.

7. Dead Link Checker


Check for broken links on any website. Links that don't work harm your search rankings and provide for a bad user experience. No downloads - just enter the name (URL) of the website you wish to check.

8. Site Liner


Find duplicate content, broken links, and more...

9. 2 bone online link checker


This is a website brought to you by a CGI programming team. The website explains
how the tool works and lets you choose how fast you want the results (which is
novel but unnecessary).

10. Add Me Broken link checker


The site is not good looking, as most on this article, but it is free so we cannot complain. It gives you a guide on how to use the tool, as it has slightly more parameters than most on this list. It is very easy to use, and even if you do struggle you can just look at the brief instructions above.


if you find any problem then comment bellow.
Read More

How to Submit Blog URL to Google,Yahoo and Bing

No comments:


Many new sites struggle to get indexed in search engine. To get faster and better index your site you must submit your URL to Google, Bing and Yahoo.Every site needs to get high ranked in search engines,If your blog has not yet indexed by the three major search engines (Google, Yahoo and Bing).Now Stop waiting and Follow Bellow Step.

Also Read : Add Flying Letters below Mouse Pointer in Blogger

Step-1  Add URL to Google :

  • Go to Google site submit URL.
  • Login with your Gmail account, Then add your site or blog URL, Enter CAPTCHA and Click Submit.
Now your request will be processed and your site get indexed shortly in Google Search.

Step-2  Add URL to Bing & Yahoo :

Now your site will be soon indexed to Bing & Yahoo.

Note :

  • Bing and Yahoo are same search engines.

After some days your blog will show in searches. Because it takes time for the search engines to index your pages. If you submit more than once, some search engines may consider this spamming which your blog reject to indexing.

Tags:

Add Blog URL to Google Search Engine
How to Submit URL to Google, Bing, Yahoo! and Ask,
Add your URL to Google
How To Submit A Site To Search Engines Like Google
How to Manually Submit Your Site to the Search Engines
Free Website URL Submission - Submit Google, Yahoo
Submit Site to Search Engines
How To Submit Your WebSite To Google Search Engines
How to submit site to search engines?
Free Web Submission Free Search Engine Submission
google add url
add url to google 
add url to google com 
add url on google 
add google url 
google url add 
add url google 
add to google url 
add a url to google 
add my url to google
how to add url in google search for free
Index Your Content Faster With the Fetch as Google Tool
How To Submit Your Website/Blog To Search Engines
Submit Your Blog to Google, Yahoo and Bing Search Engines

Read More

How to Add Custom Robots.txt file in Blogger

2 comments:


Today we're going to enable a custom Robots.Txt file in Blogger which can really help you to index your blog in Google faster and it will also make your blog more search engine friendly. Robots.txt is a text file which contains few lines of simple code. It is saved on the website or blog’s server which instruct the web crawlers to how to index and crawl your blog in the search results. That commands are written in different coding which can only be read by web crawlers. We can allow and disallow search crawlers to what area of our blog they have to crawl and what to not.In old blogger interface there is not any option to add this txt file but in Blogger's new interface we can add it easily.Always remember that search crawlers scan the robots.txt file before crawling any web page or blog.


Also Read : How to Submit Blogger Sitemap to Google Webmaster Tools

Follow this step to enable custome robots.txt file in blogger :

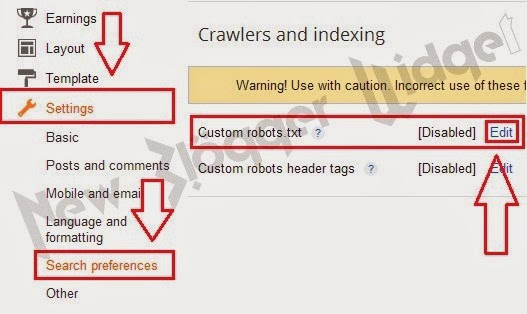
  • Go to Blogger Dashboard → Settings → Search preferences.
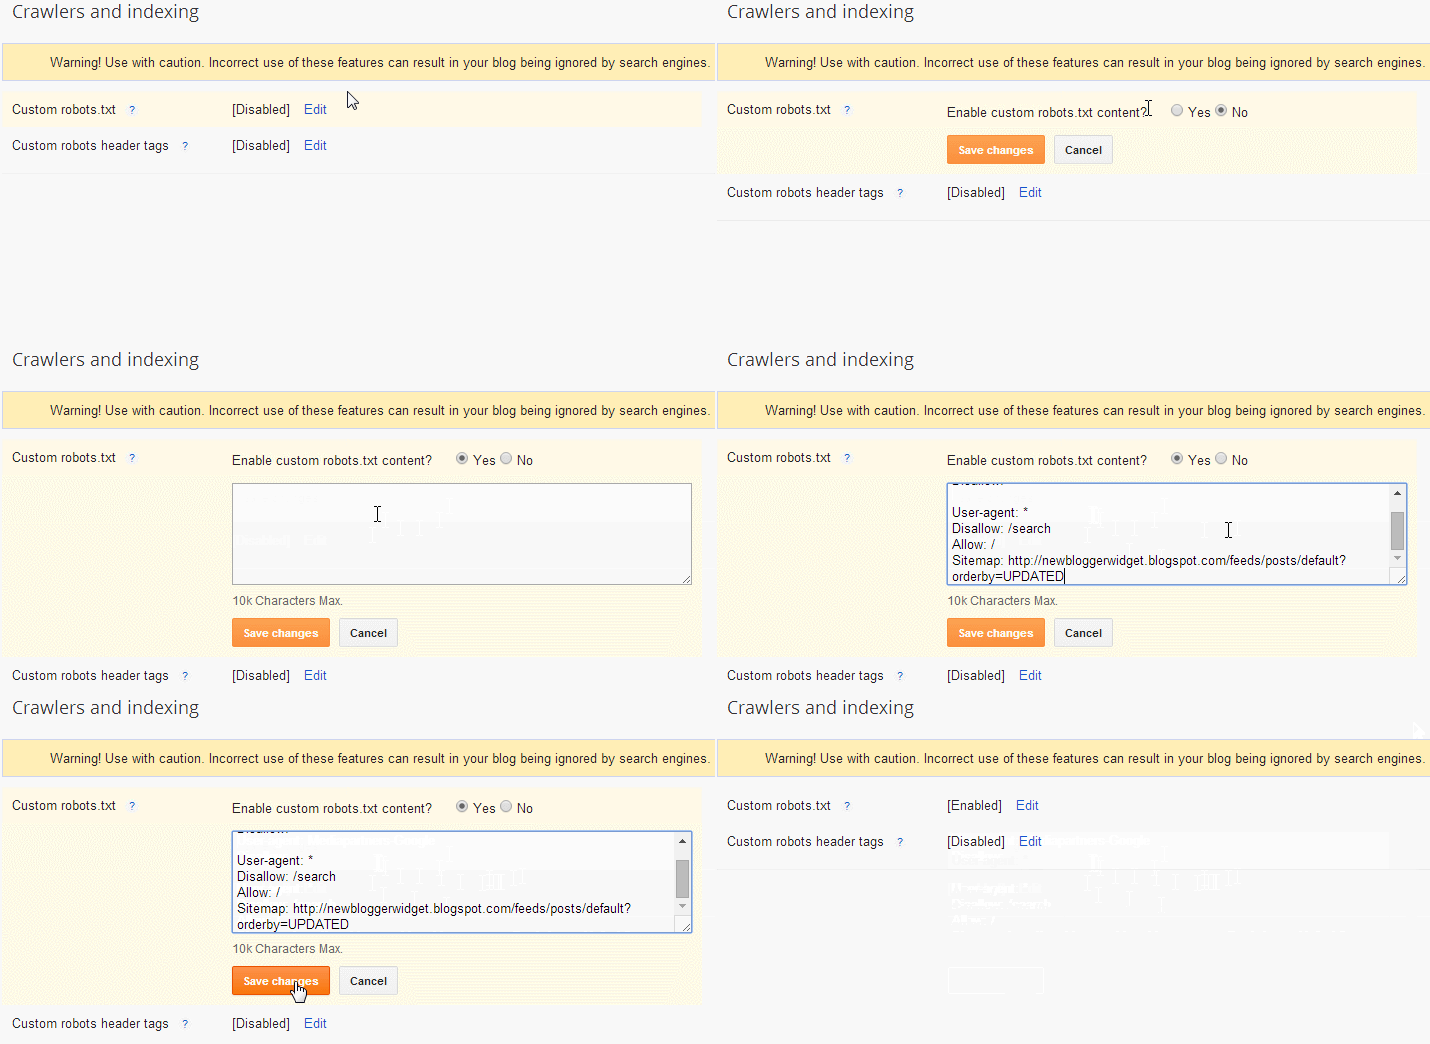
  • In Bottom Custom robots.txt section click on Edit.


  • Now a Check box will appear ,click yes and paste the bellow code (see above image).

User-agent: Mediapartners-Google
Disallow:
User-agent: *
Disallow: /search
Allow: /
Sitemap: http://yourblogurl.blogspot.com/feeds/posts/default?orderby=UPDATED

Customize :

  • Replace Red URL with your blog URL.
  • Then save it.

Read More

How to Submit Blogger Sitemap to Google Webmaster Tools

No comments:

Submit Blogger Sitemap to Google Webmaster Tools


If you want successful in your blogging career you must have to generate organic traffic to your blog.If you are a new in blogger then you should aware with the Google Webmaster Tools.Now it's time to work with off page Blogger SEO which is most important.we will do many things but in the today's post we're going to submit blogger sitemap to Google.You must be thinking that How it is most important ? So, this is really important. Just read this complete post and then ask yourself that it is really important ?.This is a great tool which is provided by Google itself. It is useful for new bloggers to get Index in Google Web Master tools.

Also Read : How To Host JavaScript And CSS Scripts On Google Drive.

Follow this step to submit sitemap :

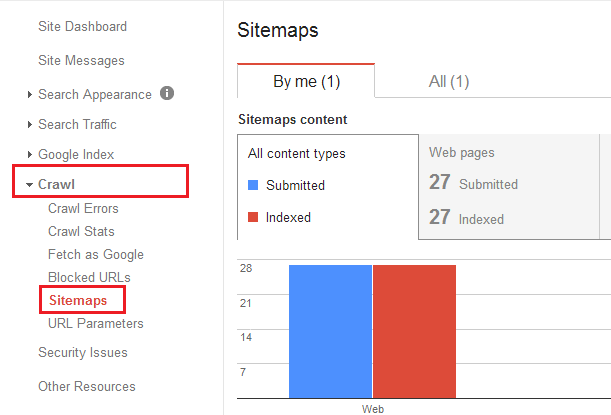
  • Go to Google Webmaster Tools Dashboard.
  • Click on Crawl → sitemaps

  • Now click on "Add/Test Sitemap"


  • Now box will appear the copy the below code and paste in the box,

  • Now press "Submit Sitemap"
atom.xml?redirect=false&start-index=1&max-results=500

Note :

  • Above code is for 1-500 post,if you have more then 500 post then add bellow code.
atom.xml?redirect=false&start-index=500&max-results=1000 

  • CONGRATULATIONS ! You've Successfully submitted Sitemap to Google.When your sitemap is successfully indexed then you will see your posts showing in search results. But one thing Google shows those posts on top which are unique and quality. So try to make your blog's posts more unique and quality to drive more traffic from Google.


Read More

How To Optimize Blogger Title SEO Friendly For Higher Search Results

2 comments:

 Today I am Sharing How to make blogger Title SEO Friendly.Page title is the most important element in your blog in terms of ranking high in search engines.

In Blogger default template display your blog title in front of post title,so page title normally show as :


After Optimizing the blog title,it will show like this :


So having the post titles at the beginning your blog chance to found. 


Also Read : How to add Meta Tags in Blogger 2014.

Follow this step to optimize blog title :

  • Go to Blogger Dashboard → Template → Edit HTML.
  • Find bellow code
<title><data:blog.pageTitle/></title>

  • Now Replace above code with bellow code
<b:if cond='data:blog.pageType == &quot;index&quot;'>
<title><data:blog.pageTitle/></title>
<b:else/>
<title><data:blog.pageName/> | <data:blog.pageTitle/></title>
</b:if>

  • Now Save your Template
  • You done all !.

Read More

Add a Custom 404 Page Not Found for Blogger

1 comment:

Custom 404 Page Not Found for Blogger


In this post i will teach How to enable custom 404 Error page for blogger. This SEO custom 404 page appears only when a reader visit a page that does not exist or deleted.In the past with old Blogger interface we're unable to create a custom error page but now it's possible because now that option is also available in search preferences settings.You can create a custom error page as per your blog design and creativity.Those who don't know about 404 Error page can read the below post to understand it.


Also Read : How to Add Support us Widget for Blogger. 


Follow this step :

  • Go to Blogger → Setting → Search Preference


  • Now under Error and redirections you can find Custom Page Not Found. 
  • Click on edit option.


  • Now a box will appear,In the box paste the bellow code.


<style>
#error-page {
    background: #007dbd;
    background: url(https://blogger.googleusercontent.com/img/b/R29vZ2xl/AVvXsEilFPprKClCIsxfdw98v1S6ZOgteX4o0eZjY-k5oI0rxEaZemNj_aHOSqIBxprYHg6obS0w9UXg9zbUvTWGvjNB0kKkvg9ue0UViemo09DdEy0ppgF_WpQ2G9Gzm0vc4icXsfvvEgcv2-k/s1600/nbw404.gif)no-repeat top center,-moz-radial-gradient(center 40%, circle cover, #007dbd 0%, #003650 100%);
    background: url(https://blogger.googleusercontent.com/img/b/R29vZ2xl/AVvXsEhb090UZDqSAdTpJnkMF4M9T47QkMuG4BLqB3HY8Nv_4Mxh_PCJOX0sOwM2e-BaWqw5vDnx0_rLK_lZ6VFhGh_hvJeIfldXCiKuRuKzhZajvGVd-vsLkdeSGqKPX213wcVrkZgbMPEQ16A/s1600/nbw-404.gif)no-repeat top center,-webkit-gradient(radial, center 40%, 0,  center 40%, 800, from(#007dbd), to(#003650) );  
        text-align:center;
        position:fixed;
        top:0px;
        right:0px;
        bottom:0px;
        left:0px;
        padding-top:270px;
        z-index:999999;
}
#error-page  h1 {
        font-size:540px!important;
        position:absolute;
        font-family:impact,sans serif!important;
        top:70px;
        left:50%;
        letter-spacing: -8px;
        margin-left:-502px!important;
        width:960px;
        z-index:-2;
        color:rgba(0,0,0,.09)!important;
}
#error-page  h2 {
        font-family:arial black,sans serif!important;
        text-transform:uppercase;
        font-size:80px;
        line-height:66px!important;
        letter-spacing: -3px;
        color:#fff!important;
        margin:0!important;
        padding:0!important;
}
#error-page p a,
#error-page p a:visited,
#error-page p a:hover{
        font-family:arial black,sans serif!important;
        text-transform:uppercase;
        font-size:56px;
        line-height:40px!important;
        border:none;
        font-weight: bold;
        color:rgba(0,0,0,.5)!important;
        margin:0!important;
        padding:0!important;
        text-decoration:none!important;
}
</style>
<div id='error-page'>
 <h1>404</h1> <h2>LINK BROKEN</h2>
 <h2>PAGE NOT FOUND</h2>
 <p> <a href='/' title='Home Page'> Back to Home Page</a></p>
</div>


  • Now Save it and enjoy


Read More

How to add Meta Tags in Blogger 2014

2 comments:


Meta tag is one kind of tag which provides information to the search engines about a website and its content. This type of practice helps a website for indexing to search engine and help to get more traffic. Usually Blogger template is not well optimized with keywords and meta tags which does not play important role any more but to make a website look good you have to optimized it well.so today i will show you how you can add Meta tag Description and Meta tag keywords in your blogger template.

Follow this Step :

  • Login to Blogger Dashboard
  • Go to Template → Backup Template (Before template customization you must create backup)
  • Then click Edit HTML → press in your keyboard CTRL+F to open search option.
  • Find this <head>.


<meta content="text/html; charset=UTF-8" http-equiv="Content-Type"/>
<meta content="width=1100" name="viewport"/>
<meta content="CONTENT TITLE HERE" name="title"/>
<meta content="YOUR WEBSITE KEYWORDS HERE" name="keywords"/>
<meta content="YOUR WEBSITE DESCRIPTION HERE" name="description"/>
<meta content="YOUR WEBSITE'S SUBJECT" name="subject"/>
<meta content="AUTHOR NAME HERE" name="author"/>
<meta content="AUTHOR EMAIL ADDRESS HERE" name="Email"/>
<meta content="Global" name="distribution"/>
<meta content="all" name="audience"/>
<meta content="all" name="robots"/>
<meta content="index,follow" name="robots"/>
<meta content="en-us" name="language"/>
<meta content="General" name="rating"/>
<meta content="CLASSIFIED CONTENT NAME" name="classification"/>
<meta content="(c) 2014 YOUR WEBSITE NAME" name="copyright"/>
<meta content="TOPIC NAME" name="topic"/>
<meta content="YOUR WEBSITE URL" name="url"/>
<meta content="YOUR CONTENT CATEGORY" name="category"/>
<meta content="YOUR FACEBOOK PAGE ID" name="fb:page_id"/>
<meta content="YOUR PAGE NAME" name="pagename"/>
<meta content="worldwide" name="coverage"/>
<meta content="5 days" name="revisit"/>
<meta content="5 days" name="revisit-after"/>
<meta content="document" name="resource-type"/>
<meta content="YOUR COUNTRY" name="country"/>
<meta content="blogger" name="generator"/>
<meta content="WEBSITE OWNER NAME" name="owner"/>


  • Now copy the above meta tags and paste below <head>.  
  • Remove the Red Highlighted  with your details.
  • Now Save your template.


Soon Search Engine will crawl your website and they will add your meta tag description and keywords to the search engine.
Read More

How to Optimize blog post title to H1 tags for better SEO 2014

1 comment:


                        This is an Important Tricks for SEO, Heading tags have a great important in Search Engine Results,Heading tags are form H1 to H6, H1 tags have Higher Priority, By default blogger post title is in H3 tag,


Follow this Simple Step :

  • Go to Blogger.
  • Select Template → Edit HTML
  • Now Find the below code or <H3

<h3 class='post-title entry-title'>
      <b:if cond='data:post.link'>
        <a expr:href='data:post.link'><data:post.title/></a>
      <b:else/>
        <b:if cond='data:post.url'>
          <b:if cond='data:blog.url != data:post.url'>
            <a expr:href='data:post.url'><data:post.title/></a>
          <b:else/>
            <data:post.title/>
          </b:if>
        <b:else/>
          <data:post.title/>
        </b:if>
      </b:if>
  </h3>

  • Now Change all <H3 to <H1
  • Save your template & wait for few weeks
  • Now see the Change in Google SERP.


If you get error from the webmaster comment below

Read More